How to Boot the Nexus 6P into Recovery Mode – Now I’m going to show you how to boot the Nexus 6p into recovery mode, to do this we need to power down the device, once the device is powered off, we’re going to boot into fast boot mode. To do this we’re going to press and hold the power button, and the volume down button, at the same time while the device is off, and then we get to this fast boot mode menu, from here you’re going to control this menu with the volume up and volume down buttons.
We want to highlight the recovery mode option, once highlighted go ahead and press the power button to select it.this is going to take us to the initial recovery mode screen, where it says no command right there that’s normal. now if you have a custom recovery, you’ll just boot over right into that custom recovery but for stock recovery, we get this no command screen. now from here, we want to press and hold the power button, and then shortly after holding the power button. we’re going to press the volume up button once, and then we’re going to let go above. as you can see that takes us to the Android stock recovery for the Nexus 6p.

How to Boot the Nexus 6P into Recovery Mode
How To Fix Nexus 6p Bootloop
If you got a boot loop on your Nexus 6p which is your phone calls from black to Google logo, and back again, in a loop without going to launch in the Android. I’ve got a solution for you, and if you follow each step, in the exact disorder gonna fix it, and your phone is gonna be alright.
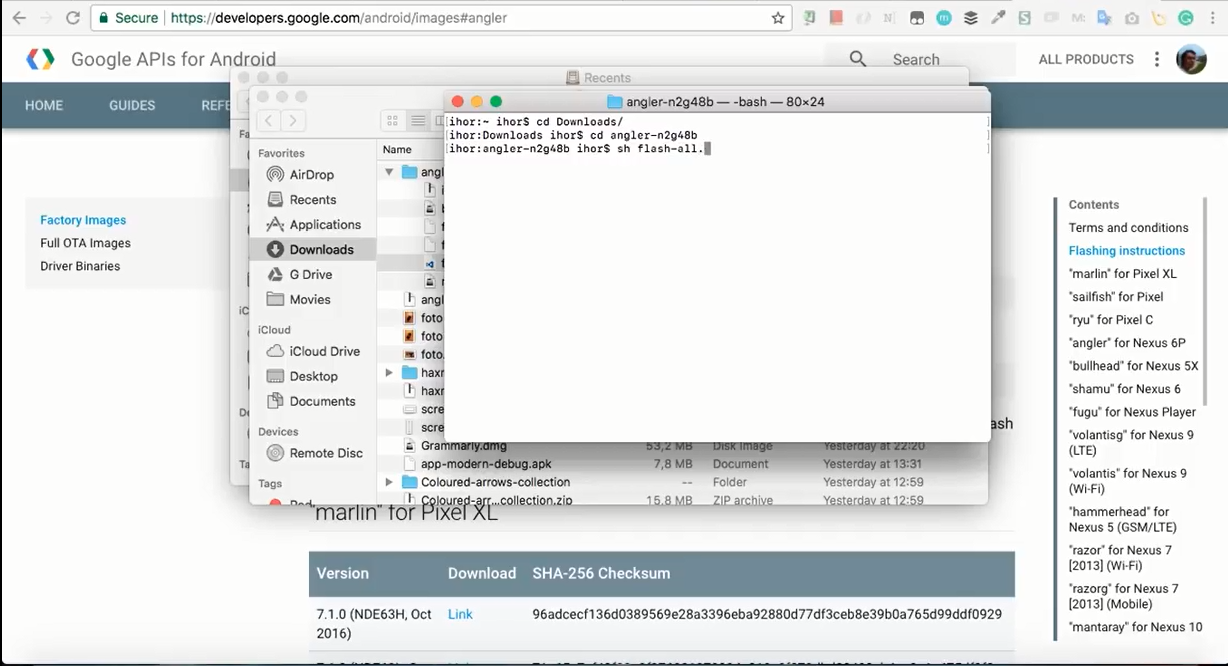
So first what you need to do is to install ADB which goes with Facebook, you can see the instructions here I’m gonna link here :
- Install ADB : https://goo.gl/zyMHKo
So then open terminal and check adb. if it gives this output, then your adb is installed, and check fastboot. if it brings some output, then you got everything ready, and let’s go to the next step.
How To Fix Nexus 6p Bootloop
See Also: Configure an Email Settings for Verizon Users
Nexus 6p Bootloop
Now when your phone is in the loop, hold the power button and volume down, for at least 10 or 20 seconds. as long as it takes to for it to launch this screen. where you see and Android and arrow up and down buttons. next connect your phone to your computer via a USB cable, and from a computer in the terminal run first boot devices, just to check if your phone is connected, and then run first boot flashing unlock.
You see my device is already unlocked, if it brings out that flashing unlocking is not allowed, then you need to take the following step. if it says that device successfully unlocked, then you can skip the next step. leave your phone in this loop, and put it under working fan for 15 – 20 or how many minutes it takes for it to launch, it will launch eventually, after it hits up and disables part of its course, just leave it like this, wait till it launches.
Now go to settings about phone, and click multiple times on bills number to become a developer. I’m a developer now, so it doesn’t display anything for me. then go back, and go to developer options, and enable OAM unlocking. I have it already unlocked and now restart the phone. now after you’ve unlocked your OEM in settings, go to bootloader again, and from a terminal run face boot, flash and unlock, and your device will be unlocked.
Reboot to Bootloader
Now we need to check our Android version, go to recovery mode, when you see the centered, hold power button, and press volume up, just once, and then look at the third line from top. if you see and to g48 be in the middle like, I have then you find and you can skip the next step, otherwise go to the next step.
Now go to this link factory images for Nexus and pixel devices, I’m gonna link HERE :
-
Download Nexus 6p N2G48B factory image from here: https://goo.gl/7DEkfZ
And you see here factory images. Go to Nexus 6p, and look for this version that I know mentioned before, and to g48b, you see here download it. now once downloaded, open the folder and run either flash – all that Sh or that, but depending on whether you’re on Mac or Windows, like this, and clear and run foolish like this.
I’m not gonna run it because it’s gonna flush my image, and did it everything, but it’s just gonna take a few minutes, and when it’s done, it’s gonna restart your phone, and you will get this kind of nugget to version, and now here is the final step. open this link which you can find HERE :
-
Download N2G48B_4Cores.img here : https://goo.gl/XX753G
Download the file. now get to the downloaded directory. We go to your phone to the bootloader again, connected to your computer and from a terminal, run first boot flash boot, and to g48b that image file to install this patch, which disables for course, after its installed you’re not gonna have a boot loop anymore, but if Veronica’s gonna be super slow.
Recovery Mode Android
Now that’s it if you took all this those steps in the correct order, and didn’t miss anything, you’re gonna have your Android running again, but there is a few downsides. so what we did it is say, we disabled four out of eight cores, and it affects performance dramatically. I mean my phone just got slow as hell my phone is just cut, so slow that it performs like, one of those budget cheap phones from like 2013, or like you know sGM.
I once had this phone it stopped at jellybeans, because it’s and it was so slow, it’s so that’s what you gonna have your Nexus 6p, now it’s gonna perform like this phone for example my Google Maps, they can up they don’t start, sometimes they just don’t work my home launcher, sometimes crashes.
You know every apps crash cuckoo camera doesn’t work sometimes, sometimes it just takes an HR picture and it Hangs, and then basically it crashes, and photo didn’t saved, at all all right guys now got one more thing for you there is a way to speed up your CPU’s even with those four CPU’s that you have left, you can speed them up, so that at least you get some performance.
So the first you need to do is download this image, it’s a custom recovery, then after you downloaded it at the link you can find it , Extra step might get your phone into a permanent bootloop, do it on your own risk ;
- Download twpr.img recovery here : https://goo.gl/ScgftS
- Download EX4_1_1_4Cores.zip here : https://goo.gl/fEV7k5
- Android Flle Transfer : https://www.android.com/filetransfer/
Open bootloader and run first boot flash recovery, and link here today that image file, you’re gonna have a custom recovery, and also download this zip file.
It can I need it for later, now open your new recovery mode, you will be prompted to enter a password just press cancel, but I don’t have it press wipe, for my data and then the Ria’s, and confirm. right now you can I need some program to copy files from your computer to Android.

Nexus 6p Bootloop
Apply Update from SD Card
I’m using Android file transfer. I think it’s there is both Mac and Windows versions, when your phone is in this new recovery, could connect it to your computer and launch Android file transfer, you’re gonna see this directory. where we can a copy our this file, this zip file copy it here.
Now open your recovery press install, and navigate to this directory, and select our zip file. so here you can select two or cloaca CPU’s, and here basically that’s it, this way you can make your six feet faster, because without this thing, I wouldn’t even think of using this phone anymore, explosion and hoped it helps you.